My Family’s Gingerbread Houses (with Template)

Since I was a little girl, we have made gingerbread houses every year for Christmas, with few exceptions. It is a family tradition, one we love and look forward to every year. We get the whole family involved. Some years, we make huge structures that require support and tools to put together, and other years we make smaller houses. Some years we make individual houses, and some years we make one large project. This year we will show you how to make a “medium” size, pretty simple, gingerbread house for a fun family activity. Large enough that you can be creative in your decorating, but not so large that it requires special tools. Mom and Kaija are joining me for this adventure as they do every year; dad is always in the background sampling and giving support. Here are our family’s gingerbread houses for Christmas 2020.
Ok, so maybe you are one of those who have not dared to make your own gingerbread house from scratch before. It can seem a little daunting, but let me assure you, it is so much fun. I would recommend that you break this process up into 3 steps. We often do gingerbread houses over three days. It allows for things to cool and harden, and each step becomes very manageable. Sure, you could do the whole thing in one day, but that may be stressful. This is supposed to be a fun activity, after all.
1st step: We make the dough and bake the pieces. Then we let them cool overnight.
2nd step: We decorate each piece with icing. Then we let it sit, preferably overnight, to let the icing harden.
3rd step: Put the house together with icing. Then let it harden completely before trying to move it.
Some people prefer to switch the last two steps, and that is ok too. We have just found that it is easier to pipe on a flat surface than on a vertical one.

Here are a few tips that we have learned over the years that may make your gingerbread house experience a little smoother:
- To maintain the integrity of the shape of each gingerbread piece, do not move the pieces once they have been cut. In other words, use silicone mats or parchment paper underneath so that you can easily slide them onto baking trays. It takes a little extra effort initially, but it pays off when you fit the house together at the end. The baking process distorts the shape slightly, so slight imperfections are expected.
- Air bubbles may occur during baking but can easily be corrected by gently pressing down with a spatula. This correction can be done as soon as the piece comes out of the oven before it cools.
- Be sure to let the gingerbread house pieces cool completely before attempting to decorate.
- Let the decorated pieces sit for several hours until the icing is hard.
- Assemble the house by using icing as glue. It is useful to have a cake board or thick cardboard for the base of the gingerbread house.
- If you decided to add lights to the house, cut out space for a small light bulb to come through the base cardboard before assembling the walls. We use a small round night light bulb (4-7 watts). We use one from the Department 56 Christmas house collection. (Amazon.com)
- Start with the sidewall and a front piece. Squeeze a line of icing on each surface edge that you want to attach to each other. (We use empty canning-jars to support the walls while they harden.) Next, add the other sidewall and the back piece. You want to do this before the first two harden, as you may have to adjust them to fit together. It is good to reinforce the wall junctures inside the house with a little extra icing before attaching the roof.
- Once you have all four walls up, let it sit to harden for a good hour before attempting to put on the roof. You will need to hold the roof in place for a few minutes before it will sit on its own. Do one side at a time.
- If you cut out windows, you may want to attach a piece of wax paper to the back of each window to give the illusion of frosted windows. If this is your first time, you may just want to pipe on the windows.
- We used disposable piping bags with two different tips for decorating our houses this year; a small round tip for detail and a small star tip for everything else.
- We used plant-based food coloring for the wreaths, candles, and house color. It always gets a little messier when you deal with colored icing, but the gingerbread house looks fantastic in just white icing too.

As you can tell, we are excited about our gingerbread houses in my family. It is part of the Christmas Season for us. It seems that we are in danger of losing some of those wonderful traditions that were so much a part of our grandparent’s Christmases when homemade paper decorations and stringed popcorn was the norm of the day. When Christmas was about God and gifts were about making life better for others. My grandma tells the story of being super excited about one orange for Christmas.
It is an unusual Christmas this year. Some of us are dealing with difficult hardships. Christmas may be a lonely time. But let us hang on to the hope of a better tomorrow. May God richly bless you this Holiday Season.

Download My Gingerbread House Template
Print the template pattern. It is easier to cut around if you print on card stock. You should have 3 pieces: side wall, front/back wall, and roof.
When cutting the dough, cut 2 side walls, two front/back pieces, and 2 roof pieces. The pattern can stick to the dough, so sprinkle the dough with some flour. Cut around the pattern, being careful not to cut the silicon or paper underneath.
Click Here to Watch Us Make this recipe on YouTube!
Print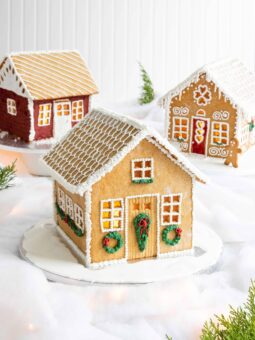
Our Family Gingerbread Houses
- Yield: 1 House 1x
Description
This gingerbread dough has been designed for gingerbread houses, so the baked pieces are crisp and sturdy.
Ingredients
- 6 3/4 cup all-purpose flour
- 1 tablespoon cinnamon
- 1 1/2 teaspoon ground ginger
- 1/2 teaspoon salt
- 1 1/2 cup light corn syrup
- 1 1/4 cup light brown sugar
- 1 cup vegan margarine
Instructions
- In a saucepan, combine light corn syrup, brown sugar, and margarine. Stir constantly over medium heat until everything has melted together.
- In a kitchen aid mixing bowl, combine flour, cinnamon, ginger, and salt.
- Add the syrup mixture into the flour mixture, and stir to combine. This step is easiest with a kitchen aid stand mixer but can certainly be done by hand. Make sure the syrup is warm when you add it to the flour mixture, this will make it easier to knead into a dough. Once it comes together into a nice dough, you are ready to make the gingerbread house. If the dough is too soft, you can chill it in the fridge for a few minutes, but most of the time, we have not found this necessary.
- Print the template pattern. It is easier to cut around if you print on card stock. You should have 3 pieces: side wall, front/back wall, and roof. When cutting the dough, cut 2 side walls, two front/back pieces, and 2 roof pieces. The pattern can stick to the dough, so sprinkle the dough with some flour. Cut around the pattern, being careful not to cut the silicon or paper underneath.
- Cut into the desired shape, 1/4 inch thick. If you want cut-out windows, do this before baking. You can also draw the windows with icing afterward, especially if you do not plan on putting lights in the house. To maintain the integrity of the shape of each gingerbread piece, do not move the pieces once they have been cut. In other words, use silicone mats or parchment paper underneath so that you can easily slide them onto baking trays.
- Bake at 350F for 12-15 minutes. Bake smaller pieces separately as baking times will vary. Air bubbles may occur during baking but can easily be corrected by gently pressing down with a spatula. This correction can be done as soon as the piece comes out of the oven before it cools.
- Let cool completely before icing.
Royal Icing Recipe:
- 4 cups powdered sugar
- 3 tablespoons vegan meringue powder
- 6 tablespoon water
In a non-plastic stand mixing bowl, add powdered sugar, meringue powder, and water. Beat at medium speed for 5 minutes, until icing is glossy and holds peaks. The icing dries very quickly; cover icing with a damp towel if not used right away.
We used disposable piping bags with two different tips for decorating our houses this year; a small round tip for detail and a small star tip for everything else. We used plant-based food coloring for the wreaths, candles, and house color.
Assembling the Gingerbread House:
- Assemble the house by using icing as glue.
- It is useful to have a cake board or thick cardboard for the base of the gingerbread house. If you decide to add lights to the house, cut out space for a small light bulb to come through the base cardboard before assembling the walls. We use a small round night light bulb (4-7 watts).
- Start with the sidewall and a front piece. Squeeze a line of icing on each surface edge that you want to attach. Next, add the other sidewall and the back piece. You want to do this before the first two hardens, as you may have to adjust them to fit together.
- Once you have all four walls up, let it sit to harden for a good hour before attempting to put on the roof. You will need to hold the roof in place for a few minutes before it will sit on its own. Do one side at a time.
- Finish the house with a dusting of powdered sugar.
Looking for a gingerbread cut-out cookie recipe? Click Here for my recipe!

How much ginger is used. I don’t see it in the ingredients list.
Thank you kindly
Thank you so much for letting me know! I have added the 1 1/2 teaspoons ginger to the recipe. I am so sorry!
Chef Ani, I made your gingerbread house.
As usual I don’t have all purpose flour so I used whole wheat, I didn’t have corn syrup so I used honey and I like ginger so I grated fresh ginger very finely in there plus the powdered ginger.
Everything came together so well and was so pleased by it being our first time. My toddler and I finger painted the outside of the house with the icing, she is 2 and we didn’t bother with perfection this year. Whether it was meant to be eaten or not we started eating it and it tastes so so good, the extra ginger with the crunchy texture to it is just so tasty. Thank you very much your videos helped lots lots.
Awwww… I am so extremely happy to hear your gingerbread house experience. I have such fond memories of making gingerbread houses with my family. You are making memories that will last a lifetime. Thank you so much for trying my recipe.
hi! i wanted to know if this could be made with butter instead of vegan margarine?
Hi Isabelle,
Yes, butter should work great in this recipe! Thank you so much for your comment.
Love this recipe. Great flavor, sturdy, and easy. Thank you.
Aww… I am so happy to hear that! Thank you so much for your 5-star review!
This is a great recipe for Gingerbread Houses – we used it last year and here I am again looking for the template as we will do it again. Highly recommend!
Thank you so much, Betsy! I am so happy to hear that you have enjoyed the recipe! Thank you so much for your very kind comment. Happy Baking!