Vegan Pavlova
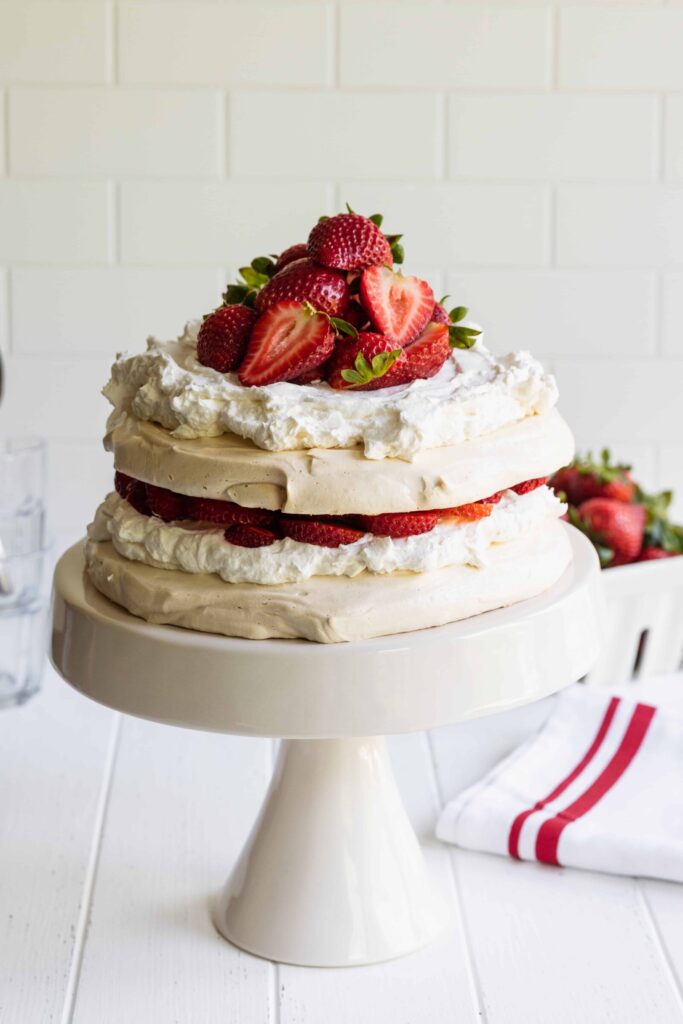
This egg-free vegan pavlova is a delightful twist on the classic dessert, offering the same airy, melt-in-your-mouth texture but made entirely plant-based. With a crisp, golden exterior and a soft, marshmallow-like center, it’s topped with a vibrant mix of fresh fruit and a dairy-free whipped cream that adds a rich, creamy finish. Whether you’re hosting a special occasion or simply craving something sweet, this vegan meringue recipe promises to impress with its elegant presentation and irresistible flavor.
Craving more vegan baking delights? Check out these delicious recipes: Vegan Lemon Raspberry Cake for a zesty treat, Vegan Coffee Cake for a comforting breakfast or snack, and Vegan Strawberry Shortcake recipe for a delightful summer dessert.
Traditionally an Australian and New Zealand favorite, Pavlova is a light, crisp meringue dessert topped with fresh fruit and whipped cream. This vegan version substitutes egg whites with Aquafaba (the liquid from canned chickpeas or other legumes), allowing for a similar texture and structure without animal products.
In recent years, Vegan Pavlova has become a popular choice for special occasions like birthdays, New Year’s Eve, and weddings. It’s a light, refreshing alternative to traditional cakes, perfect for those seeking a less heavy dessert. It also makes it a hit at holidays like Easter and Thanksgiving.
With its crisp exterior and marshmallow-like center, topped with seasonal fruits, this dessert is an eye-catching centerpiece for any celebration, especially those focused on sustainability, health-consciousness, or dietary restrictions.
Why You’ll Love This Vegan Pavlova
- Quick and Easy: This pavlova comes together in no time. Simply whip the aquafaba, bake it to perfection, and finish it with your favorite fruits and cream.
- Healthy & Nutritious: Made with plant-based ingredients, this dessert is naturally dairy-free, egg-free, and lower in fat than traditional pavlova without sacrificing flavor.
- Kid-Friendly: With its marshmallow-like center and crisp, delicate outer shell, this pavlova is a fun and delightful treat for kids.
- Customizable: To suit your taste and creativity, you can easily personalize your pavlova with fresh fruits, vegan whipped cream, or even edible flowers.
- Special Occasion-Worthy: For holidays, birthdays, or romantic dinners, this vegan pavlova makes a stunning and impressive dessert perfect for any celebration.
- Delightfully Light: This pavlova is light and airy, offering a sweet, satisfying end to your meal without feeling heavy.

What is a Vegan Pavlova?
Named after the famous Russian ballerina Anna Pavlova, this dessert is known for its light, airy texture. In the traditional version, egg whites create a meringue-like consistency, but the vegan version uses aquafaba (chickpea brine) to achieve the same vegan meringue effect. This plant-based adaptation delivers all the charm and flavor of the classic dessert, ideal for special occasions like Easter, Valentine’s Day, or any celebration.
What is Aquafaba?
Aquafaba is simply the brine from cooked chickpeas. It acts like eggwhites when whipped. We like to use the Goya (canned chickpea) brand for this whipped aquafaba recipe as it has given us great consistent results. The whole cake requires only the brine (chickpea liquid) from one 15 oz can, so a little goes a long way.
A few years ago, it would have been unthinkable to make a Pavlova cake completely plant-based, but that was before the discovery of Aquafaba (chickpea water) in 2014. Since then, a whole new world has opened to the vegan and plant-based population; yes, we can even make pavlova cakes, which is the recipe for today.
This cake is one for the books, beautiful, unique, and so delicious. When my mom and dad were dating many years ago, one of their favorite things to do was to drive to a unique little rustic restaurant in the middle of nowhere that served a special pavlova. That cake was not vegan, but when we discovered we could make this cake using Aquafaba, it was a happy day in my home, and I hope it will be in yours too.

Ingredients & Substitutions
To make your vegan pavlova, here are the ingredients you’ll need, along with some helpful substitutions:
- Aquafaba: When whipped, the brine from cooked chickpeas is an excellent egg white alternative. For consistent results, I recommend Goya canned chickpeas.
- Pinch of Salt: Any salt, such as sea salt, table salt, or kosher salt, will help enhance the flavor and stabilize the meringue. Avoid using coarse salt, as it may not dissolve properly.
- Fresh Lemon Juice & Lemon Extract: A splash of fresh lemon juice and lemon extract adds a bright, tangy note that perfectly balances the sweetness. The lemon flavor compliments the strawberries wonderfully, making this pavlova even more delicious. Lime juice can be used as an alternative if necessary.
- Vanilla Extract: Pure vanilla extract or vanilla bean paste amplifies the overall flavor profile. For the best outcome, choose high-quality vanilla.
- Superfine Sugar: I use natural cane sugar, which can be slightly grainy. To achieve a smooth meringue, grind the sugar in a blender for a few seconds to make it superfine. If a blender isn’t available, opt for store-bought superfine sugar, such as caster sugar.
- Vegan Whipped Topping: Top your pavlova with a light, creamy whipped topping. Options like Trader Joe’s Vegan Whipping Cream, Silk, Vegan Truwhip, Rich’s Whip Topping Base, Coconut Whip, or Whipped Coconut Cream work beautifully.
- Fresh Strawberries: Juicy, naturally sweet strawberries make the perfect topping for this pavlova. Their tartness complements the meringue and whipped topping, creating a harmonious and balanced dessert.
Recipe Variations and Add-ons
When it comes to personalizing your dessert, there are many ways to make it your own with a few simple tweaks. Here are some delicious variations and add-ons to consider:
- Tropical Fruits: Add a tropical twist by topping the Pavlova with diced mangoes, passion fruit pulp, kiwi fruit, and toasted coconut flakes for a bright, exotic flavor.
- Carob or Chocolate Drizzle: Drizzle melted vegan chocolate or chocolate ganache over the meringue for a rich, decadent touch.
- Mixed Fresh Berries: For a vibrant and colorful berry topping, combine raspberries, blueberries, and blackberries with strawberries.
- Citrus Zest: To enhance the citrusy flavor, sprinkle a grated lemon or orange zest over the whipped topping.
- Vegan Lemon Curd: Switch up this beautiful recipe and top it with a layer of vegan lemon curd for a citrusy twist.
- Nuts: Sprinkle a few chopped pistachios on the finished pavlova for a nutty crunch in texture.
These variations can be easily incorporated to make the dessert uniquely yours. Don’t hesitate to experiment with seasonal fruit and enjoy a creation that suits your taste!
Allergy-Friendly Options
Gluten-Free: This recipe is naturally gluten-free since it requires no flour, making it perfect for those with gluten sensitivities or celiac disease.
Nut-Free: To keep it nut-free, use coconut cream or a nut-free vegan whipped topping, such as Silk Dairy-Free Heavy Whipping Cream. These options provide a creamy texture without any nuts.
Oil-Free: This recipe is naturally oil-free with no added oils, making it a lighter dessert option.
Soy-Free: To ensure the recipe is soy-free, choose a coconut-based whipped cream or another soy-free vegan whipped topping. This keeps the dessert safe for those with soy allergies.
Egg-Free: This recipe is entirely egg-free, thanks to aquafaba, which mimics the properties of egg whites and creates a fluffy, meringue-like consistency.
How to Make Vegan Pavlova
- Prepare the Oven and Baking Sheets: Preheat the convection oven to 250°F. Prepare two baking sheets and line them with parchment paper. If using a conventional oven, place both cakes on one large baking sheet to ensure even baking.
- Drain and Prep the Garbanzo Liquid: Drain the liquid from a can of garbanzo beans and set the beans aside for other uses. Pour the liquid into a clean electric stand mixer bowl. Add lemon juice, lemon extract, and a pinch of salt. Whisk the mixture at medium speed until frothy.
- Incorporate Vanilla and Sugar: Add vanilla and fine sugar or caster sugar gradually, one spoonful at a time, while whipping at medium speed. Once all the sugar is added, whip at high speed until stiff peaks form, about 5–10 minutes. The vegan meringue is ready when peaks stand upright.
- Shape the Cakes: Divide the meringue evenly between the prepared baking sheets. Shape into two cakes, about 8.5 – 9 inches in diameter. Note: Thicker cakes will take longer to bake.
- Bake the Cakes: Reduce the oven temperature to 230°F. Bake for 2 hours and 30 minutes or until crisp. Turn off the oven and open the door for 15–30 minutes to cool. Optionally, leave the cakes in the oven with the door cracked overnight to ensure dryness. We want to make sure it is completely dry. It will look more like a hard meringue.
- Cool the Cakes: Remove the cakes from the oven and cool on wire racks. Keep the parchment paper under the cakes until ready to serve. Gently peel the parchment paper from the cakes when serving. A slight stickiness is typical, but the cakes should maintain their shape.
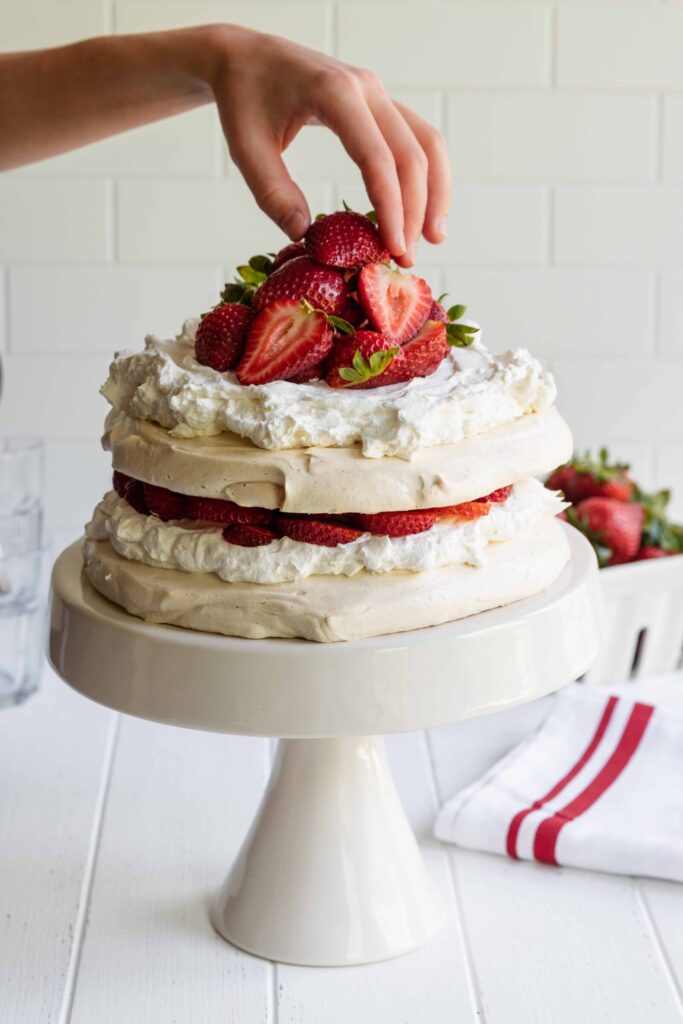
- Add Whipped Topping and Garnish: Spread vegan whipped topping over the first cake. Top with cut strawberries. Repeat with a second layer for a double-decker cake, garnishing the top with halved strawberries. Add the whipped topping just before serving, because the cream will soften the cake quickly.
- Store and Serve: Store the cakes in a dry place until ready to serve. Assemble and garnish just before serving to preserve the texture.
What Can I Serve with Vegan Pavlova?
This light and airy dessert is perfect for any occasion and pairs beautifully with drinks, ice cream, and sides. Here are some serving ideas to elevate your pavlova experience:
- Strawberry Sorbet: Serve with a scoop of creamy strawberry sorbet for a cool, smooth complement to the cake’s lightness.
- Strawberry Limeade: Pour a glass of vibrant and refreshing strawberry limeade that adds a burst of color and flavor to complement the sweetness of the cake.
- Hot Lemonade: The warm, zesty flavor of hot lemonade adds a comforting, citrusy contrast to the airy texture of this treat.
- Summer Fruit Salad with Lime-Mint Dressing: A refreshing mix of ripe summer fruits, brightened with a tangy lime-mint dressing, providing a light and zesty balance.
Whether enjoying a quiet evening or hosting a special occasion, these pairings will take your pavlova to the next level!

Tools and Equipment
To make this vegan pavlova, you’ll need a few essential tools to ensure the best results. Here’s a list of equipment that will make your baking experience easier and more efficient:
- Stand Mixer: A must-have for whipping aquafaba to the perfect stiff peaks, ensuring smooth and consistent results. This tool makes the process quick and effortless. You really need an electric stand mixer for this recipe. It is possible that you can make it with a hand mixer, but I would recommend a powerful stand mixer as the Aquafaba needs to be whipped fiercely. It takes 5-10 minutes, depending on your machine, to get the right result. You should be able to turn the bowl upside down with the topping still in the bowl.
- Blender: Ideal for grinding cane sugar into a fine, powdery texture that blends seamlessly into your mixture, ensuring a smooth vegan meringue. If you don’t have a blender, use a super fine sugar such as caster sugar to make this recipe.
- Baking Trays & Parchment Paper or Baking Paper: These will prevent the meringue from sticking to the baking tray and help promote even heat distribution, leading to a perfectly baked finish.
With the right tools, you’ll be well-equipped to create a stunning and delicious pavlova!

How to Store Vegan Pavlova
- Fridge: Store the assembled pavlova in an airtight container for up to 2 days. Remember that the meringue may soften slightly over time, but it will still be delicious.
- Freezer: For longer storage, freeze the meringue shells separately for up to 3 months. When ready to serve, thaw the shells at room temperature before assembling them with whipped topping and fresh fruits.
Tips and Tricks for the Best Vegan Pavlova
- Allow the aquafaba to reach room temperature before whipping. It helps achieve a better, fluffier meringue with more volume.
- Avoid over-beating. Stop whipping as soon as stiff peaks form. Over-beating can cause the meringue to become dry and unstable.
- Ensure your bowl and whisk are free of grease or oil, as even a tiny amount can prevent the aquafaba from whipping correctly.
- To cool and store, make sure the cakes rest in a dry place, as it picks up moisture quickly. We have found that the cake gets the right gooey consistency when adding the cream and berries. If the cake is not cooked through, it may deflate. Just as delicious, but a lot gooier, and not quite as pretty:)
Nutritional Health Benefits of Aquafaba
This viscous liquid from cooked legumes, particularly chickpeas, offers many health benefits. It is low in calories and fat, making it an excellent option for those looking to manage their weight while still enjoying satisfying meals. It is also rich in protein, fiber, and essential minerals like iron, potassium, and magnesium to support heart health and improve digestive function. Additionally, it provides antioxidants that help reduce oxidative stress and boost the immune system. As a plant-based substitute for eggs, it offers a valuable alternative for those with dietary restrictions, ensuring a well-rounded and nutritious diet. (1)

FAQ’s
Can I use homemade Aquafaba?
Yes, homemade Aquafaba can be used, but make sure it’s thick and consistent, similar to canned versions, for optimal results.
How do I make homemade aquafaba?
To make homemade aquafaba, drain the liquid from a can of chickpeas or white beans into a bowl. Simmer it for 10-15 minutes for a thicker consistency, then let it cool. It can be stored in the fridge for up to a week or frozen.
How do I know the meringue is ready?
The meringue is ready when it holds stiff peaks and doesn’t move or slide when the bowl is flipped upside down.
Can I make the Pavlova ahead of time?
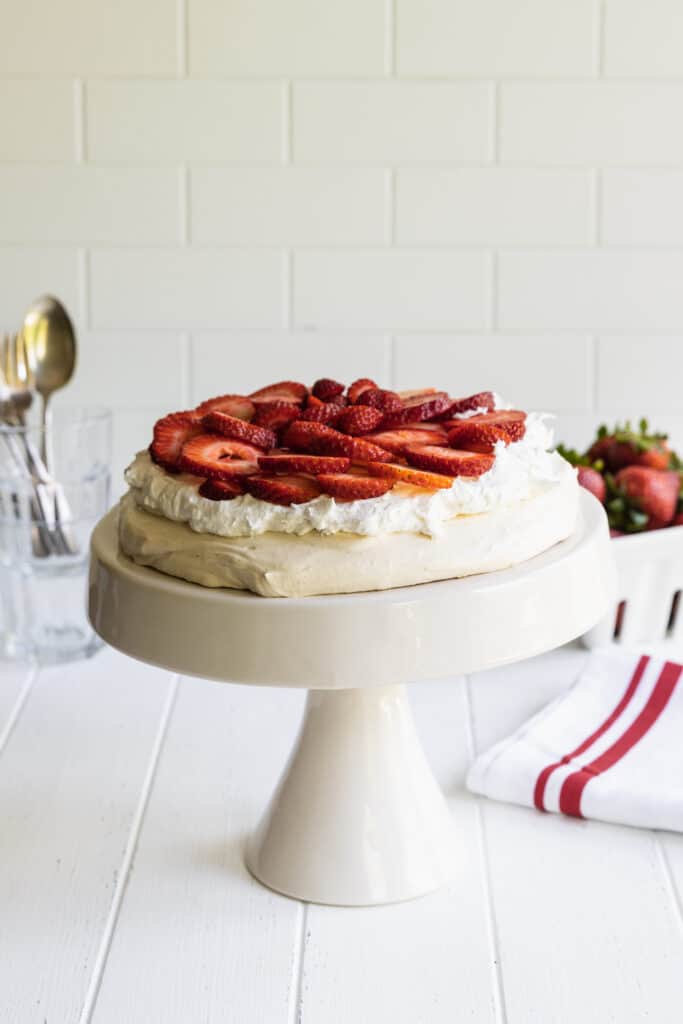
Yes, you can bake the Pavlova a day or two in advance. Store it in an airtight container at room temperature to maintain its crispness. When ready to serve, place a generous amount of whipped topping on the top of the Pavlova, and finish with fresh cut strawberries.
Why is my Pavlova chewy instead of crisp?
Chewiness can result from underbaking or excessive humidity. Ensure the oven is at the right temperature and allow the Pavlova to cool slowly to prevent moisture buildup.
How can I prevent my meringue from being too sweet?
You can slightly reduce the sugar, but be mindful, as sugar is essential for stabilizing the meringue. Consider adding a touch of lemon juice for a refreshing balance.
Vegan Whipped Cream or Topping:
There are so many good options for vegan whipped topping these days; use your favorite, spreadable whipped topping. We love the Trader Joe’s Vegan Whipping Cream, Silk Whipping Cream, Vegan Truwhip, Rich’s Whip Topping Base, or Coconut Whipped Cream, to mention a few. Keep in mind that the moisture from the vegan whipped cream softens the cake almost instantly, so it should not be added to the cake until right before serving. Be generous with the whipped topping.
Decorate the Pavlova with Berries
The fresh berries on top bring the whole cake together. We have chosen strawberries this time as it is the beginning of the strawberry season in New England, but you can be creative here. Because the cake is sweet, we have found no need to add sugar to the berries. Should you be fortunate enough to live near a strawberry patch, it will be worth a trip to get some extra sweet and tender strawberries for this dessert.
This year we have strawberries of our own, or at least we hope so, we have a few strawberry plants that are currently producing what we hope will eventually be sweet, delicious berries, but they are not ready yet.
This cake sounds difficult to make, but if you keep these few things in mind, it should be a fantastic dessert.
I hope you enjoy this Vegan Pavlova Cake recipe as much as my family and I do.
Watch My Vegan Pavlova Recipe Video
Vegan Pavlova
- Yield: 1 cake (2 layers) 1x
Description
This vegan pavlova features a crisp, airy meringue made from aquafaba, topped with luscious whipped cream and fresh strawberries. It’s a light, naturally sweet dessert perfect for any occasion.
Ingredients
- 3/4 cup Aquafaba (liquid from one can of Goya garbanzo beans, 15 oz.)
- pinch of salt
- 1 teaspoon fresh lemon juice
- 1/4 teaspoon lemon extract
- 1 teaspoon vanilla extract
- 1/2 cup superfine sugar (all-natural cane sugar blended in vita mix)
- Favorite whipped vegan topping (Trader Joe’s Vegan Whipping Cream, Silk, Vegan Truwhip, Rich’s Whip Topping Base, or Coconut Cream)
- Fresh Strawberries
Instructions
- Preheat the convection oven to 250°F. Prepare two baking sheets and line them with parchment paper. If using a conventional oven, place both cakes on one large baking sheet to ensure even baking.
- Drain the liquid from a can of garbanzo beans and set the beans aside for other uses. Pour the liquid into a clean electric stand mixer bowl. Add lemon juice, lemon extract, and a pinch of salt. Whisk the mixture at medium speed until frothy.
- Add vanilla and sugar gradually, one spoonful at a time, while whipping at medium speed. Once all sugar is added, whip at high speed until stiff peaks form, about 5–10 minutes. The meringue is ready when peaks stand upright and when you can turn the bowl upside down without the meringue moving.
- Divide the meringue evenly between the prepared baking sheets. Shape into two cakes, about 8.5 – 9 inches in diameter. Note: Thicker cakes will take longer to bake.
- Reduce the oven temperature to 230°F. Bake for 2 hours and 30 minutes or until crisp. Turn off the oven and open the door for 15–30 minutes to cool. Optionally, leave the cakes in the oven with the door cracked overnight to ensure dryness.
- Remove the cakes from the oven and cool on wire racks. Keep the parchment paper under the cakes until ready to serve. Gently peel the parchment paper from the cakes when serving. A slight stickiness is typical, but the cakes should maintain their shape.
- Spread vegan whipped topping over the first cake. Top with cut strawberries. Repeat with a second layer for a double-decker cake, garnishing the top with halved strawberries. Add the whipped topping just before serving, softening the cake quickly.
- Store the cakes in a dry place until ready to serve. Assemble and garnish just before serving to preserve the texture. Again, be mindful that the cake softens quickly.
Notes
- If you do not have a convection oven, try to get both cakes on one large baking sheet tray.
- There are many great options for vegan whipped topping. You can consider Trader Joe’s Vegan Whipping Cream, Silk Whipping Cream, Vegan Truwhip (already whipped and ready to serve), Rich’s Whip Topping Base, or Coconut Whipped Cream. Be mindful that the moisture from the whipped topping softens the cake almost instantly, so it’s best to add it just before serving.
- Thicker cakes may require additional baking time.
- To ensure the cakes remain dry and crisp, leave them in the oven overnight with the door cracked.
- Assemble and garnish the cake just before serving to preserve its texture.

Looking for More Chickpea Recipes?
Sources:


I think what would make the recipe easier is using the aquafaba whip as the whipped cream part.
Thank you so much for the 5 star review. I really appreciate that! I think that is a great idea, I have never tried it.