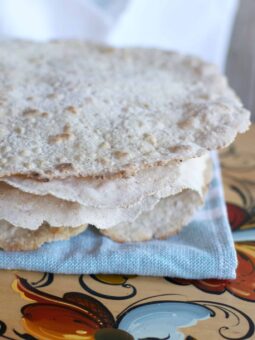
Gluten-Free Norwegian Flatbrød (Flatbread)
This gluten-free Norwegian flatbread is an excellent alternative to traditional Norwegian flatbread.
Made with 3 ingredients and a little water, this budget-friendly and easy-to-make gluten-free recipe is an excellent addition to many a meal, and really, who isn’t impressed by homemade bread?

These tasty flatbreads are pretty simple to make, and they are just as delicious as the traditional Norwegian flatbread I shared recently.
Flatbreads are a wonderful accompaniment to many different meals and are the perfect crispy cracker bread to serve to your guests.
Why you’ll love these gluten-free Norwegian flatbreads
- Gluten sensitivity or intolerance: Gluten-free flatbreads are a great option for those with celiac disease, gluten sensitivity, or intolerance, as they are made without wheat, barley, or rye, which are common sources of gluten.
- Versatile: Gluten-free flatbreads can substitute for regular crackers or bread.
- Easy to make at home: Gluten-free flatbreads can be easily made with just a few simple ingredients. This means you can have fresh, homemade flatbreads whenever you want!
- Delicious taste: Gluten-free flatbreads can have a unique flavor and texture that is different from traditional flatbreads but can still be delicious in their own right.
- Lighter and easier to digest: Gluten-free flatbreads are more delicate and generally easier to digest than traditional flatbreads, which can be a great option for people with digestive issues.
Looking for more Bread Recipes?
- Roasted Garlic & Fresh Rosemary Dutch Oven Bread
- Phenomenal Homemade Whole Grain Bread
- Vegan Banana Bread
- Vegan Cornbread
- Norwegian Potato Lefse
Ingredients and substitution notes
- Gluten-free oat bran hot cereal: Bob’s Red Mill brand is a great option for this recipe, but you can use any gluten-free oat bran hot cereal you prefer.
- Bob’s Red Mill Gluten-free 1:1 baking flour: Bob’s Red Mill brand is my recommended ingredient because it already contains xanthan gum, which is essential for binding the flatbread together. However, you can use any gluten-free 1:1 baking flour that contains xanthan gum or other binding agents.
- Salt: Use any type of salt that you prefer. You can adjust the amount of salt according to your taste preferences. Instead of using regular salt, you can use sea salt or Himalayan salt for added minerals.
Recipe variations and add-ins
- Herb Flatbreads: Add dried herbs such as rosemary, thyme, or oregano to the dough for a fragrant and flavorful variation.
- Sweet Flatbreads: Add a tablespoon of maple syrup to the dough and sprinkle cinnamon on top for a sweet treat.
- Seed Flatbreads: Add sunflower, pumpkin, or sesame seeds to the dough before cooking for a nutty crunch.
- Spicy Flatbreads: Add red pepper flakes to the dough for a spicy kick.
- Nutty Flatbreads: Mix finely chopped nuts like almonds, walnuts, or hazelnuts into the dough for an extra crunch and flavor.
Top tips
If you’re aiming for the stars with your flatbreads, here are some pro tips to getting you there:
- Try using a non-stick surface: Make sure you use a non-stick surface, such as parchment paper or a non-stick pan, to prevent the flatbreads from sticking and breaking apart.
- Rest the dough: Resting the dough for at least 30 minutes before rolling it out will help it to relax and prevent it from shrinking during cooking.
- Roll the dough thinly: Roll the dough out as thinly as possible to ensure the flatbreads cook evenly and become crispy.
- Heat the pan properly: Heat your pan or griddle properly before cooking the flatbreads. Too low heat may make the flatbread soggy and too high heat may burn it.
- Watch the cooking time: Watch the flatbreads carefully as they cook, flipping them when the edges start to curl up and the bottom has turned golden brown. Overcooking may make the flatbread hard and dry.
Make ahead of instructions and storage
Make ahead:
- Prepare the dough in advance: You can prepare the dough for gluten-free Norwegian flatbreads a day or two ahead of time and store it in the refrigerator until ready to use.
Storage Instructions:
- Room temperature: Gluten-free Norwegian flatbreads can be stored at room temperature in an airtight container or plastic bag for up to 2-3 days.
- Freezer: You can freeze gluten-free Norwegian flatbreads for up to 3 months. Once the flatbreads have cooled, wrap them tightly in plastic wrap and store them in an airtight container or freezer bag. Thaw the flatbreads at room temperature or in the refrigerator before reheating.
Gluten-Free Norwegian Flatbread Serving suggestions
- With a spread or dip: Spread some hummus, guacamole, or your favorite dip on top of the flatbread for a healthy snack or appetizer.
- As a side dish: Serve the flatbread as a side dish with soups, stews, or salads for a tasty and satisfying meal.
- Topped with vegan cheese and vegetables: Top the flatbread with sliced tomatoes, onions, and vegan cheese.
FAQs
Can I use different types of gluten-free flour to make Norwegian flatbreads?
Yes, you can use different types of gluten-free flour to make Norwegian flatbreads.
It’s important to use a gluten-free flour blend that is specifically designed for bread making, as this will help to give your flatbreads the right texture and flavor.
How can I tell when the flatbreads are cooked?
The flatbreads are cooked when the edges start to curl up and the bottom has turned golden brown.
Can I make gluten-free Norwegian flatbreads ahead of time?
Yes, you can make gluten-free Norwegian flatbreads ahead of time. You can prepare the dough in advance and store it in the refrigerator until ready to use. Or you can make a large batch of flatbread and store at room temperature
Watch My Gluten-Free Norwegian Flatbread Video:
Gluten Free Norwegian Flatbrød (Flatbread)
Description
This gluten-free Norwegian flatbread is an excellent alternative to this regular Norwegian flatbread. Made with 3 ingredients and a little water, this budget-friendly and easy-to-make gluten-free recipe is an excellent addition to many a meal, and really, who isn’t impressed by homemade bread?
Ingredients
- 32 oz warm water (7 dl)
- 1 pound Gluten Free Oatbran Hot Cereal (Bob’s Red Mill)
- 1 pound Gluten Free 1:1 baking flour (Bob’s Red Mill)
- 1 teaspoon salt
Instructions
Place hot water in a mixer.
Add salt.
In a separate bowl, mix together the two types of flour.
Add the flour to the water a little at a time until it forms a nice dough. You may not use all the flour. You should reserve approximately 1 cup of the 1:1 Gluten Free flour to use as you roll out the dough.
Knead for about 5 min.
Remove from mixer and place on a rolling mat.
Divide the dough into approximately 32 pieces.
Heat the griddle to 500F.
Make each dough piece into a round ball. Flatten.
Use the remaining flour to make sure the dough does not stick as you roll the dough out. Make sure to roll from the middle out, turn frequently, and flip over several times during the process until the dough is about 10 in. in diameter. They should be very thin. This is crucial in order to get the crunch and flavor that you want.
Add to the griddle and bake until brown spots appear. Flip and do the same on the other side. We usually keep the oven at 200 F during this time, and when we are done baking each piece , we store them in the warm oven until we are done. This will crisp them up nicely.
Store in a dry place. Can last a very long time if stored correctly. It stores better in paper bags than in plastic. In the old days these were stored in large wooden chests.

Pingback: Chef Ani - Phenomenal Homemade Whole Grain Bread
Thank you for this recipe. Love it!
Aww… Thank you so much for your kind comment and for the 5-star review, Terry! I am so happy to hear you liked the recipe.